

Finding unexplained bites or dark spots on your bedding often points to bed bugs hiding in your box spring. These pests prefer the hidden crevices of wooden frames and fabric seams over the mattress itself. A quick glance is rarely enough to spot them before the infestation grows out of control.
This guide explains exactly how to check box spring for bed bugs using proven inspection methods. You will learn to identify visual clues, use monitoring tools effectively, and distinguish between real threats and false alarms. Follow these steps to protect your home from a full-scale invasion.
Strip and Decontaminate Bedding Before Inspection
Start your inspection by removing all sheets, pillowcases, and comforters from the bed. Even if you do not see bugs on the fabric, eggs or hidden pests could be present. Place these items directly into a hot dryer set to at least 120°F for 30 minutes to kill all life stages.
Prevent Cross-Contamination During Removal
Keep removed bedding in a sealed plastic bag until it reaches the dryer. Do not place dirty linens on the floor or other furniture. This simple step stops potential bugs from spreading to other rooms while you work.
Ensure Proper Heat Penetration
Avoid overloading your dryer during this process. A stuffed load will not heat evenly, which may leave bugs alive in the center of the pile. Run smaller loads to guarantee the thermal death point is reached throughout the entire cycle.
Prepare Your Inspection Tools and Safety Gear
Gather specific tools before you begin examining the bed frame. You need a bright LED flashlight to penetrate dark crevices and a magnifying glass to spot tiny nymphs or eggs. Wear gloves if you plan to handle dusty areas or remove debris from tight spaces.
Lift the Box Spring Safely
Box springs are heavy and awkward to move. Bend your knees and keep your back straight when lifting corners to inspect the underside. Ask for help if needed to avoid back strain or sudden injuries during the process.
Clear the Surrounding Area
Move nightstands, rugs, and curtains away from the bed frame. Bed bugs often hide in baseboards or fabric folds near the bed. A clutter-free zone improves your access and reduces escape routes for any pests you disturb.
Focus on Key Hiding Zones in the Frame
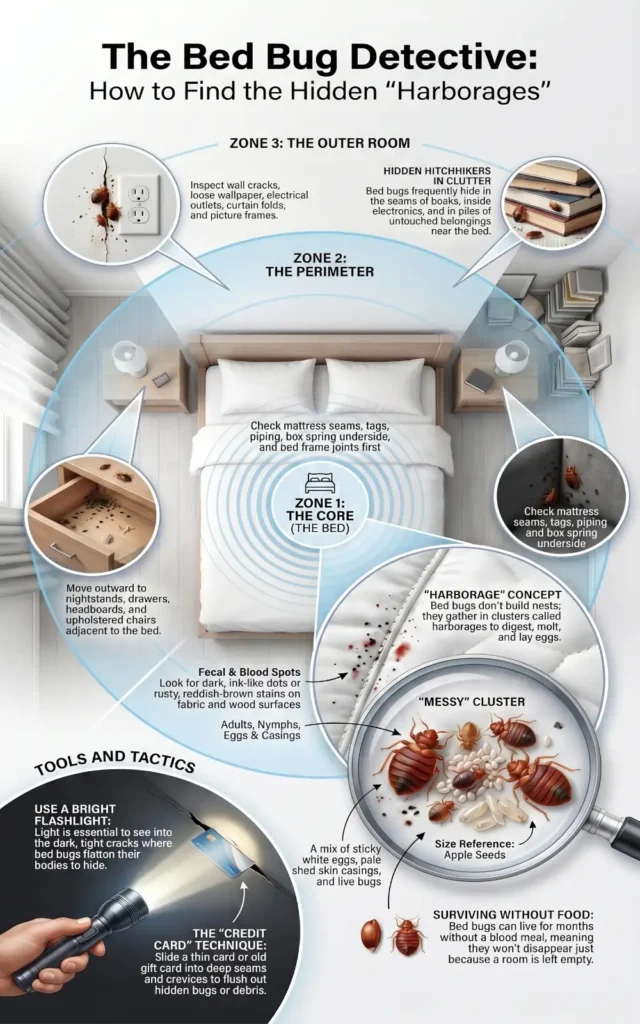
Direct your flashlight beam along the perimeter seams where fabric meets the wooden frame. This area is a prime harbor for bed bugs and often holds the first signs of trouble. Run your finger gently along the seam to feel for bumps or irregularities.
Inspect Corners and Joint Connections
Remove plastic corner guards if they are accessible without causing damage. Examine the joints where wooden pieces connect, as bed bugs love these tight, dark spaces. Shine your light into these crevices to look for clusters of tiny white eggs or fecal stains.
Examine Screw Holes and Wood Cracks
Bed bugs have been found deep inside screw holes in the wooden frame. Use your magnifier to peer into these small openings for tiny bugs crawling inside or dark specks of feces. Even small cracks in the wood or tears in fabric serve as potential entry points.
Remove Dust Cover to Inspect Interior Frame
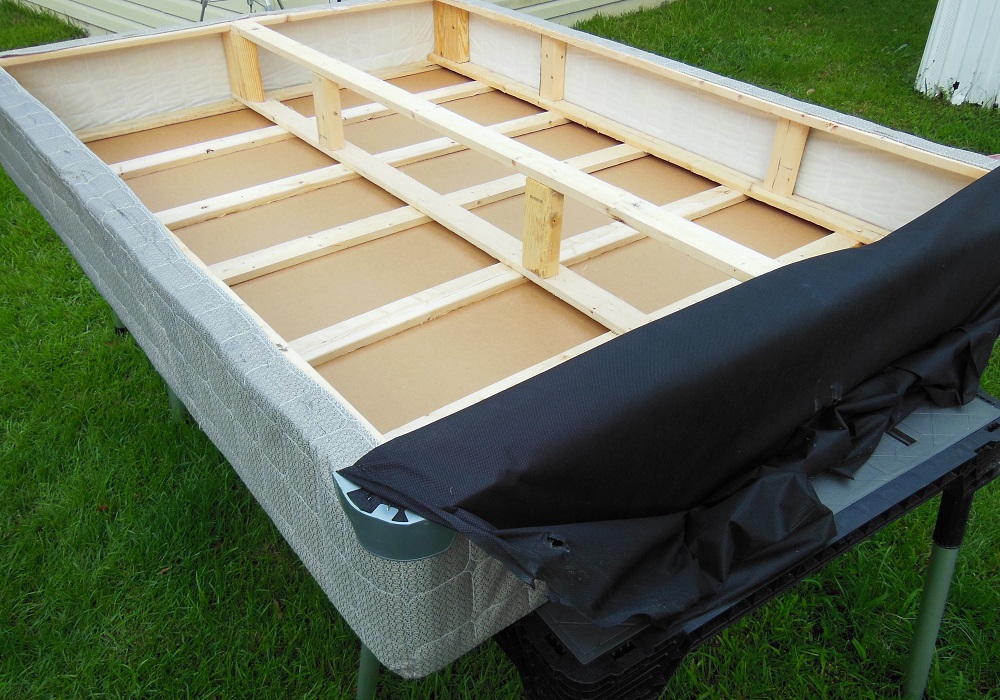
Homeowners should remove the bottom dust cover to see the internal frame clearly. This felt or fabric sheet is stapled to the underside and often hides a significant portion of the infestation. Use a flathead screwdriver to gently pull staples if you own the bed.
Analyze the Internal Wooden Slats
Shine your flashlight inside the frame once the cover is removed. Focus on the wooden slats, joints, and spaces between metal springs. Look for live bugs, eggs, or dark spots on the wood that were previously hidden from view.
Reattach and Seal the Cover Afterward
Re-staple the dust cover tightly after your inspection is complete. This maintains the bed’s appearance and prevents dust buildup inside the frame. If you suspect an infestation, consider sealing the cover with bed bug-proof tape.
Identify Visual Clues of Active Infestation

Look for adult bed bugs that are flattened, oval-shaped, and about the size of an apple seed. They turn darker after feeding, making them easier to spot against light-colored fabric. Nymphs are much smaller and translucent, requiring careful observation with a magnifier.
Recognize Distinctive Fecal Spots
Fecal spots appear as small, dark, clustered marks resembling pepper flakes or ink stains. These do not wipe away cleanly like regular dust. Smear a spot with a damp cloth, and if it leaves a rust-colored trail, it is likely bed bug waste.
Find Cast Skins and Egg Clusters
As bed bugs grow, they shed their exoskeletons, leaving behind hollow, lighter-colored shells. Eggs are tiny, white, and sticky, often laid in clusters within cracks. Finding even one skin or egg cluster confirms an active infestation requiring immediate action.
Avoid False Positive Identifications
Not all dark marks indicate bed bugs, so rule out dust, mold, or ink stains first. Dust wipes away easily, while ink has uniform, sharp edges. If no live bugs or skins are found with dark spots, it might not be an infestation.
Use Monitoring Devices for Early Detection

Visual checks alone often miss low-level infestations, so deploy interception traps under bed legs. Blackout Interceptors can detect 95% of infestations within two weeks by trapping bugs crawling up from the floor.
Boost Detection Rates with Lures
Use Active Lure inside your monitors to mimic human breath and heat. This proven attractant increases capture rates significantly compared to passive traps. Replace the lure every 4 to 6 weeks to maintain effectiveness.
Maintain Your Monitoring Equipment
Volcano monitors need cleaning every 2 to 4 weeks to remove dust that hinders performance. Blackout interceptors are low-maintenance but should be checked weekly for any captures. Never reuse traps; dispose of them in sealed bags after use.
Inspect the Mattress Alongside the Box Spring

Even if the box spring is the main target, you must inspect the mattress thoroughly. Examine top and side seams, look under labels and patches, and check for tears or loose fabric. Use the same flashlight and magnifier techniques you applied to the frame.
Understand Encasement Limitations
A sealed mattress cover does not guarantee safety if the box spring remains untreated. Bed bugs can live in the box spring and crawl onto the mattress at night. Worse, an encasement can trap bugs inside the mattress, making treatment harder.
Know Rental vs Homeowner Inspection Limits
Renters must not remove dust covers, staples, or dismantle furniture in any way. Limit your inspection to visual checks of accessible seams and using floor-based monitors. Report any findings to management immediately and take photos as evidence.
Homeowners Have Full Access Rights
You can remove covers, inspect interiors, and install permanent monitors if you own the home. Consider using bed bug-proof encasements for both mattress and box spring after treatment. This deep access allows for a more thorough eradication effort.
Set a Regular Monitoring Schedule
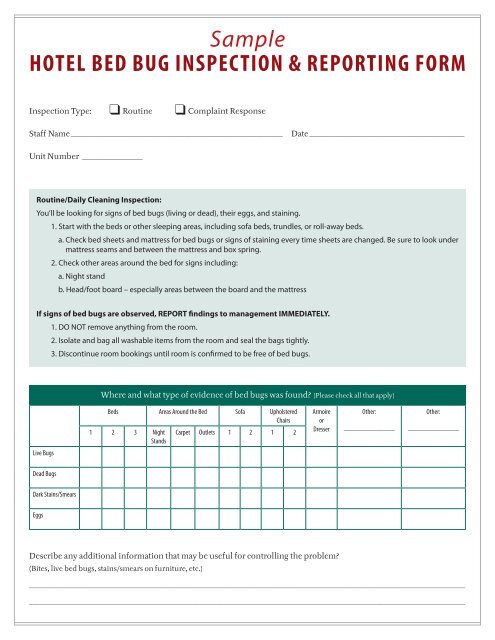
Inspect your bed every 1 to 2 weeks even if no bugs are found initially. Low populations are hard to detect, and early action prevents full infestations. Include visual inspections of the box spring and checks of your monitoring devices in this routine.
Continue Checks After Treatment
Keep monitoring for at least 6 to 8 weeks post-treatment to ensure success. Bed bug eggs can hatch weeks later, so ongoing checks confirm eradication. Do not stop your vigilance just because you have applied treatment.
Avoid Common Mistakes During Inspection
Do not vacuum and assume the problem is fixed, as this rarely removes all eggs or hidden nymphs. Vacuuming can scatter the infestation if you do not empty the canister into a sealed bag immediately. Dispose of vacuum contents outside your home right away.
Do Not Ignore the Underside
The bottom of the box spring is often overlooked but is a frequent infestation site. Bugs thrive there, especially if the top is protected by an encasement. Always inspect the underside, as this is where many infestations persist unnoticed.
Do Not Delay Professional Help
DIY methods often fail to eliminate all life stages of the pest. Professional pest control is the most effective solution for long-term eradication. They use heat treatment, targeted chemicals, and advanced detection to stop the spread.
Frequently Asked Questions About Bed Bug Inspection
How often should I check my box spring for bed bugs?
You should inspect your box spring every 1 to 2 weeks, even if you see no initial signs. Bed bug populations are elusive when low, and regular checks prevent small issues from becoming full infestations. Continue this schedule for at least 6 to 8 weeks after any treatment.
Can bed bugs live inside the wooden frame of a box spring?
Yes, bed bugs frequently hide deep inside screw holes and cracks in the wooden frame. They also congregate between wooden slats and under the bottom dust cover. This is why removing the dust cover in private homes is critical for a thorough inspection.
What do bed bug fecal spots look like on a box spring?
Fecal spots appear as small, dark, dried droppings resembling pepper flakes or ink stains. They often cluster in corners or along seams and may smear into a rust-colored trail if wet. These marks are one of the most reliable indicators of an active infestation.
Should renters remove the bottom dust cover to inspect?
No, renters should never remove dust covers or dismantle furniture as it may violate lease terms. Limit your inspection to visual checks of accessible seams, corners, and joints. Report any suspected findings to your landlord immediately with photographic evidence.
Are mattress encasements enough to stop bed bugs?
No, encasements do not eliminate infestations if the box spring remains unprotected. Bed bugs can thrive in the box spring frame and crawl onto the mattress at night. You must inspect and treat both the mattress and the box spring for effective control.
Key Takeaways for Checking Your Box Spring
The box spring is a primary hotspot for bed bugs, often holding higher concentrations than the mattress itself. Successful detection requires stripping bedding, lifting the frame safely, and inspecting interior seams and screw holes with a bright light. Homeowners should remove the bottom dust cover, while renters must rely on visual checks and monitoring devices.
Regular monitoring every 1 to 2 weeks is essential because low-level infestations are easy to miss. Use interception traps under bed legs and look for fecal spots, cast skins, and live bugs. If you find any signs, contact a licensed pest control professional immediately to stop the spread before it becomes unmanageable.