
Building a mattress frame from scratch is a rewarding DIY project that combines functionality, durability, and style. Whether you’re crafting a minimalist platform bed or a luxury upholstered frame with storage, knowing how to build a mattress frame properly ensures long-term support for your sleep setup. A well-constructed frame prevents sagging, extends mattress life, and enhances bedroom aesthetics. This guide walks you through every step from material selection and structural design to assembly and finishing.
By the end, you’ll have a professional-grade mattress frame tailored to your space, mattress type, and design preferences, all without overspending on retail furniture.
Choose Your Mattress Frame Type
The type of frame you build determines materials, tools, and construction complexity. Consider your space, storage needs, and aesthetic goals before starting.
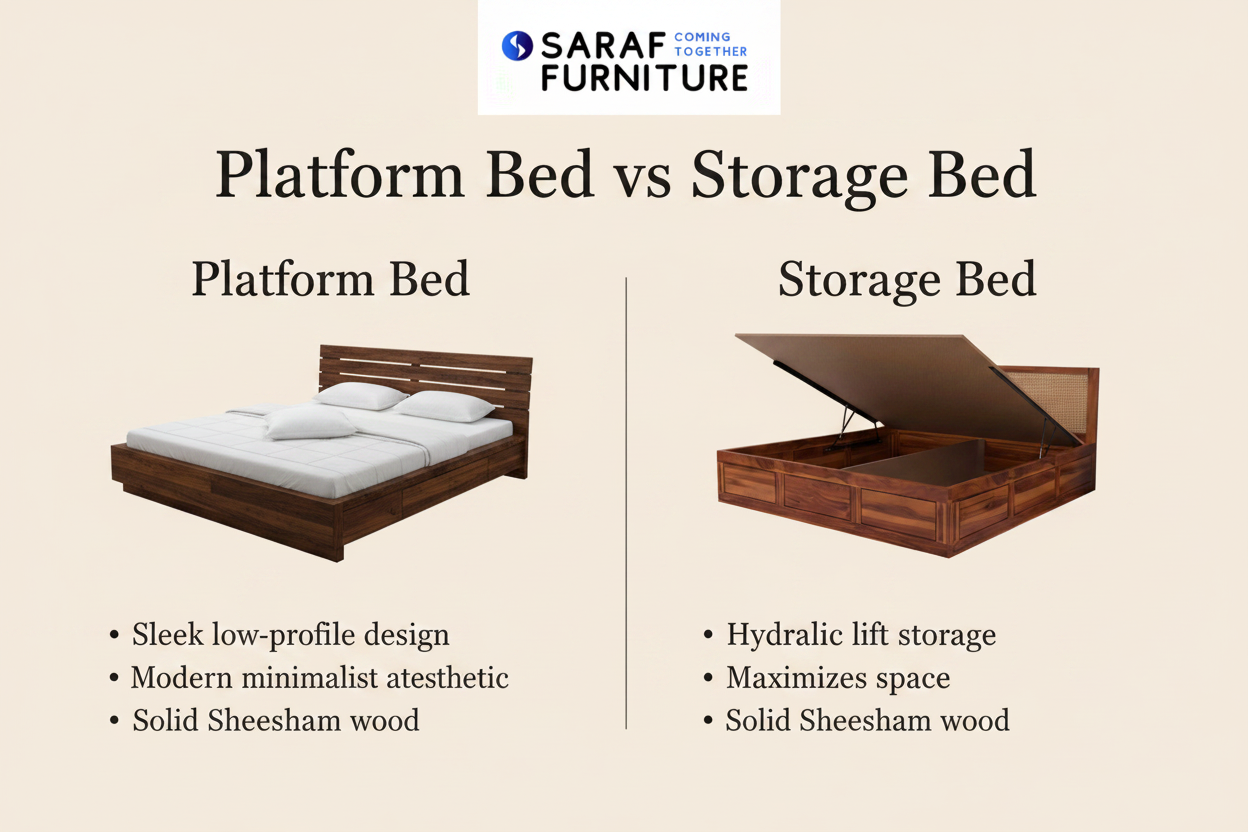
Non-Storage Platform Frame
A non-storage platform frame uses side rails, head and footboards, and slats to support the mattress directly. This design works well in guest rooms, studios, or minimalist spaces where under-bed storage isn’t needed. Build it using 1×12 boards for head and footboards and 1×2 side rails ripped to approximately 9 inches wide. Support slats with a top ledge or cleats for clean lines and solid performance. This is the simplest frame type and requires the fewest materials.
Storage Platform Frame
Maximize small-space utility with built-in drawers or lift-up compartments. Construct box frames from ¾-inch plywood and install 16-inch drawer slides for smooth access. Build three identical drawer boxes using pocket holes and dado joints for strength. Attach continuous drawer fronts with consistent gaps using shims. This design adds function without sacrificing style and works especially well in apartments or kids’ rooms.
Upholstered Luxury Frame
Create a high-end look with MDF panels wrapped in foam, dacron, and fabric like velvet or linen. Cut 18 mm MDF to size, then route fluting or tufting channels if desired. Layer padding and stretch fabric tightly from center outward, stapling edges and folding corners neatly. Back panels with black lining fabric for a clean finish. These frames offer elegance but require more time and specialized tools like a staple gun and jigsaw.
High vs Low Profile Design
Frame height affects both comfort and room proportion. Standard legs create a balanced look at 14 inches. For a modern low-slung bed, use 6 to 8-inch legs. For taller beds at 18 to 24 inches, increase leg length and add central support. Lower frames suit memory foam mattresses and contemporary decor. Higher frames make large rooms feel cozier and ease access for older users.
Measure and Plan Frame Dimensions

Accurate measurements prevent costly mistakes and ensure your mattress fits properly.
Match Mattress Size Exactly
Start by confirming your mattress dimensions. Standard sizes include:
• Twin: 38 × 75 inches
• Full: 54 × 75 inches
• Queen: 60 × 80 inches
• King: 76 × 80 inches
Build the outer frame slightly larger by adding 1 to 2 inches of clearance around the mattress for easy insertion and removal. For a king mattress, aim for outer dimensions of approximately 79.5 × 60.8 inches.
Cut List and Kerf Adjustment
Create a detailed cut list before buying materials. Include side rails cut 1 inch longer than mattress length, head and footboards equal to mattress width plus 3 inches for joint overlap, support beams, slats, legs, and drawer components. Account for kerf, the width of the saw blade, by adding 1 mm per cut when using precision tools. Final adjustments of 1/8 inch may be needed due to material swelling or joint fit.
Sketch and Finalize Design
Draw a full-scale sketch showing rail placement, support beam locations, and joint types. Mark where cleats, brackets, or pocket holes will go. Include leg positions and drawer layouts if applicable. A clear plan prevents costly mistakes and ensures all parts align during assembly.
Select Materials and Hardware
Choosing the right materials ensures your frame is stable, durable, and attractive.
Frame Lumber Options
Use stable, straight-grained wood for structural integrity. Pine or poplar offer budget-friendly options that are easy to work with. Oak, walnut, or cherry provide durability and attractive grain for visible parts. Common dimensions include 2×4 or 1×12 boards for rails and headboards, and hardwood plywood for drawer boxes. Avoid warped or twisted boards. For upholstered frames, use 12 to 18 mm MDF for smooth panel surfaces.
Support and Slat Materials
Slats must be strong enough to bear weight without flexing. Use 1×3 or 1×4 solid boards for even support, or ¾-inch plywood strips as a cost-effective alternative. Space slats no more than 3 inches apart, reducing to 2 inches for memory foam or latex mattresses. Install a center support beam using a 2×4 or long spine board for spans over 5 feet to prevent sagging.
Metal Connectors for Strength
Skip complex joinery by using Simpson Strong-Tie hardware. The APRTC2 Rigid Tie corner connector joins legs and rails with exceptional strength and requires no pre-drilling. LU light face-mount joist hangers secure center beams to head and footboards. Install these before full assembly. The APRTA rigid tie angle reinforces header corners and adds visual detail. These connectors handle heavy loads and pass real-world jump tests on king-size builds.
Fasteners and Tools
Use the right fasteners for each task. Use 2.5 to 3-inch wood screws for general assembly, pocket-hole screws for hidden joints in rails and supports, and 1.25 to 2-inch brad nails for slats and non-load-bearing parts. Outdoor Accents screws from Simpson offer corrosion resistance and pre-finished heads. Essential tools include a table saw or circular saw, drill and pocket-hole jig, brad nailer and staple gun for upholstery, clamps, measuring tape, square, and sander.
Assemble a Non-Storage Frame
This straightforward build produces a clean, modern platform bed.
Attach Head and Footboards
Cut 1×12 boards to match your mattress width, such as 60 inches for a queen. These serve as vertical end panels. Position side rails so they overhang the head and footboards by 2 inches. This creates a recessed look and strengthens the joint.
Install Side Rails with Brackets
Use interlocking bed-rail brackets with a slotted side that attaches to the head or footboard and a toothed side that fits into the side rail. To install, elevate the rail slightly to engage all teeth. Clamp a 2-inch plywood scrap to the headboard to hold the rail in place. Place a ¾-inch scrap under the rail for alignment. Secure brackets with screws. This method allows disassembly and ensures a snug fit.
Add Center Support Beam
For queen and king sizes, install a center beam running from head to footboard. Options include 2×2 vertical posts under slats, a 2×4 spine board supported by legs or cleats, or joist hangers mounted on head and footboards. This prevents mid-span sag and increases load capacity.
Install Slats Evenly
Lay 1×3 or 1×4 slats perpendicular across side rails and the center beam. Keep spacing at 2 inches apart for memory foam or latex, or 3 inches maximum for innerspring or hybrid mattresses. Rest slats on a ¾-inch ledge routed into the rail or secure with brad nails. Closer spacing improves mattress longevity.
Build a Storage Frame with Drawers
A storage frame adds functionality to your bedroom while providing a complete sleep setup.
Construct the Box Frame
Cut ¾-inch plywood into side, back, and divider panels. Attach to 1×4 support rails using screws from below. Install two end panels first, then two interior dividers evenly spaced. Add a back-side 1×4 and top front piece using pocket holes. Edge-band the front edges for a clean finish if desired.
Mount Drawer Slides
Use 16-inch full-extension slides for approximately 18-inch deep drawers. Install three pairs per side. Ensure both sides are level and aligned before securing. Test fit drawers for smooth operation.
Assemble Drawers
Build three identical drawer boxes using ¾-inch plywood for sides, front, and back. Cut dado joints for ¼-inch plywood bottom panels. Assemble with pocket screws and glue. Attach slide brackets flush with the front and bottom edges.
Attach Drawer Fronts
Rip a 2×8.25-inch board into continuous fronts. Cut to size and label each piece. Install a 1×2 top overhang piece first, extending ¾-inch beyond the drawer fronts. Clamp fronts using 1/8-inch shims to maintain even gaps. Secure from inside the drawer box with screws. Do not overtighten to avoid warping.
Complete Asymmetrical or Symmetrical Layout
Repeat the storage unit on the opposite side for symmetry. Alternatively, build one side with drawers and the other with a plain rail for visual interest. Balance the design with consistent overhangs and gap control.
Build an Upholstered Frame
An upholstered frame adds luxury and comfort to your bedroom with a padded headboard and side panels.
Prepare MDF Panels
Cut 18 mm MDF to final size, such as 27 cm wide for side panels. Sand edges smooth. Use a router or jigsaw to create fluting, tufting channels, or decorative cutouts if desired.
Install Battens for Tufting
For button-tufted effects, glue 19 cm battens across the panel spaced approximately 19.3 cm apart. Eight total battens work well for a queen-size frame. The gap will appear smaller once padding is added.
Layer Padding and Fabric
Apply layers in this order: high-density foam first, then dacron wrap for softness, then fabric with velvet pile facing inward. Start stapling at the center and work outward, pulling taut. Leave 2 inches of excess at edges. At corners, staple the top edge, wrap the side fabric, fold the bottom neatly, and re-staple. Cover the back with black lining fabric and trim excess.
Attach Panels to Headboard
Secure side panels to the headboard using wood screws and glue for permanent installation, or Velcro strips for modular design. Place Velcro along the top edge of the middle support and at top and middle of each end for easy removal.
Anchor to Wall for Safety
All upholstered frames should be anchored to the wall using brackets and wall anchors rated for bed weight. This prevents tipping and stabilizes the structure during use.
Reinforce for Maximum Strength
Proper reinforcement ensures your frame lasts decades without sagging or wobbling.
Use Cleats and Support Beams
Install small cleats using 1×2 or 1×3 boards on the bottom edge of front and rear rails, halfway between legs. These support the central spine and prevent flexing. Attach with glue, brad nails, and screws. Add cleats inside side rails flush with the bottom to stiffen long spans. This is crucial for king-size frames.
Strengthen Leg Joints
For long rails, use staggered pocket holes at ends. Apply wood glue to end grain. Clamp and screw, then flatten joints with a planer if needed. Testing shows pocket-hole plus glue joints can survive jump tests even on king-size builds.
Add Ground-Contact Legs
Include two short legs under the central spine board so it touches the floor. This transfers load directly to the ground and eliminates mid-span deflection. Use adjustable glides to level the bed on uneven floors.
Prevent Leg Height Errors
A 1/8-inch leg discrepancy can cause wobbling. Fix temporarily with glued blocks, but ideally replace the leg. Always dry-fit and check level before final assembly.
Finish and Customize Your Frame
A proper finish protects your frame and enhances its appearance.
Sand and Condition Wood
For a smooth finish, sand with 80-grit for initial smoothing. Apply wood conditioner with a clean rag. Sand again with 120-grit. Make a final pass with 120-grit after conditioning. This prevents blotching, especially on softwoods like pine.
Apply Stain and Topcoat
Use oil-based stain in small sections, wiping off excess immediately. Let dry 24 hours. Apply 2 to 3 coats of polyurethane or water-based sealer for protection. Lightly sand between coats for the smoothest finish.
Balance Asymmetrical Designs
An asymmetrical frame with storage on one side can still look balanced. Use consistent overhangs, align drawer fronts precisely, and control gap widths. Slight widening at the bottom of drawers improves visual harmony.
Assemble On-Site and Test
Careful assembly ensures everything fits perfectly.
Pre-Assemble with Washers
Mark all hardware locations on legs before final tightening. Temporarily insert washers between brackets and rails to create a gap for fine alignment. Remove washers once everything fits snugly.
Final Assembly Steps
Join legs and side rails using brackets or hooks. Tighten until rails press firmly against legs. Install the central spine beam. Lay slats evenly across the frame. Place the mattress on top. One builder transported pre-finished parts to a parent’s house for final assembly, which works well for tight doorways or multi-story homes.
Conduct Load Test
After assembly, test the frame by applying weight. Sit, stand, or simulate jumping on the frame. Check for creaks, movement, or joint flex. Tighten all screws and connectors. Re-check annually.
Maintain and Ensure Safety
Regular maintenance keeps your frame safe and beautiful for years.
Anchor Large Beds to Wall
All beds, especially tall or king-size frames, should be secured to the wall with brackets and anchors. This prevents tipping, particularly in homes with children or pets.
Check Fasteners Annually
Over time, screws and connectors can loosen. Inspect and re-tighten all hardware at least once a year. Replace any stripped screws.
Re-Finish Every 3-5 Years
Wood frames benefit from a fresh topcoat every few years. Lightly sand, clean, and reapply polyurethane or oil to maintain protection and appearance.
Follow Load Limits
Do not exceed the frame’s intended capacity. Most DIY frames support 500 to 600 pounds when properly reinforced. For heavier users, use thicker lumber and additional support legs.
Frequently Asked Questions About Building a Mattress Frame
What is the best wood for building a mattress frame?
Pine and poplar offer budget-friendly options that are easy to work with. Oak, walnut, or cherry provide superior durability and attractive grain for visible parts. Choose based on your budget and desired aesthetic.
How much does it cost to build a mattress frame?
A basic wooden frame costs approximately $150 to $200 in materials. An upholstered luxury frame runs $300 to $500, including MDF, fabric, foam, and dacron.
How far apart should mattress support slats be spaced?
Space slats no more than 3 inches apart for standard support. Reduce spacing to 2 inches for memory foam or latex mattresses to prevent sagging and extend mattress life.
Do I need a center support beam for a queen or king frame?
Yes, a center support beam is essential for queen and king-size frames. It prevents mid-span sag and significantly increases load capacity. Use joist hangers or cleats to secure it properly.
Can I build a mattress frame with no prior woodworking experience?
Yes, a non-storage platform frame is beginner-friendly and requires basic tools. Start with this design if you’re new to woodworking. Storage and upholstered frames require more experience and specialized tools.
How long does it take to build a mattress frame?
Most builds take 1 to 2 days, including assembly time. Add additional time for finishing, which requires drying periods between coats. The process is faster with pre-cut lumber and a clear plan.
Key Takeaways for Building Your Own Mattress Frame
Building a mattress frame gives you total control over design, materials, and cost. With careful planning and the right techniques, you can create a durable, beautiful bed that lasts decades. Choose a frame type that matches your space and storage needs, whether that’s a simple platform, a storage bed with drawers, or a luxury upholstered design.
Invest in quality connectors like Simpson Strong-Tie hardware and prioritize reinforcement at stress points. Use proper slat spacing based on your mattress type, and always add a center support beam for larger frames. Finish with proper sanding, conditioning, and protective coats to ensure long-lasting beauty.
Whether you choose a simple platform, a storage bed, or a luxury upholstered frame, your DIY build will outperform most store-bought options in both strength and style. Use accurate plans, select quality materials, and take your time with joints and alignment. Happy building!